This is an automated email from the ASF dual-hosted git repository.

xxyu pushed a commit to branch document
in repository https://gitbox.apache.org/repos/asf/kylin.git
commit 51abda780e77ce2abfb01239a4a052c1175de158 Author: xuekaiqi <[email protected]> AuthorDate: Wed Aug 19 10:29:16 2020 +0800 update formate and some translate --- website/_dev/about_temp_files.cn.md | 19 +-- website/_dev/about_temp_files.md | 14 +-- website/_dev/coding_naming_convention.cn.md | 14 +-- website/_dev/coding_naming_convention.md | 6 +- website/_dev/datasource_sdk.cn.md | 76 ++++++------ website/_dev/datasource_sdk.md | 11 +- website/_dev/dev_env.cn.md | 36 +++--- website/_dev/howto_become_apache_committer.cn.md | 6 +- website/_dev/howto_contribute.cn.md | 25 ++-- website/_dev/howto_contribute.md | 9 +- website/_dev/howto_hbase_branches.cn.md | 10 +- website/_dev/howto_release.cn.md | 147 +++++++++++------------ website/_dev/howto_release.md | 22 ++-- website/_dev/howto_test.cn.md | 8 +- website/_dev/new_metadata.cn.md | 26 ++-- website/_dev/new_metadata.md | 26 ++-- website/_dev/web_tech.cn.md | 34 +++--- website/_dev/web_tech.md | 6 +- 18 files changed, 240 insertions(+), 255 deletions(-) diff --git a/website/_dev/about_temp_files.cn.md b/website/_dev/about_temp_files.cn.md index dcf95a1..0054b54 100644 --- a/website/_dev/about_temp_files.cn.md +++ b/website/_dev/about_temp_files.cn.md @@ -9,21 +9,14 @@ permalink: /cn/development/about_temp_files.html * 客户端的本地文件系统 * HDFS -* hadoop 节点的本地文件系统。 +* hadoop 节点的本地文件系统 -开了一个单子来追踪这个 issue: +开了一个单子来追踪这个 issue: [https://issues.apache.org/jira/browse/KYLIN-926](https://issues.apache.org/jira/browse/KYLIN-926) 为了将来的开发,请: -* 每当您想在本地创建临时文件时,请选择 - File.createTempFile 或使用文件夹: - BatchConstants.CFG_KYLIN_LOCAL_TEMP_DIR(/tmp/kylin),不要随意使用 - /tmp 中的另一个文件夹,它会变得一团糟,看起来不专业。 -* 每当您在本地创建临时文件时,请记得在使用之后删除它 - 使用它。最好使用 FileUtils.forceDelete,因为它也适用于 - 删除文件夹。如果 Kylin 异常退出,请尽量避免使用 deleteOnExit 方法。 -* 每当您想要在 HDFS 中创建文件,请尝试在 - kylin.hdfs.working.dir 或 BatchConstants.CFG_KYLIN_HDFS_TEMP_DIR 下创建文件,以及 - 记得在它不再有用之后删除它。尽量避免投掷 - 一切到 hdfs:///tmp 并将其留作垃圾。 +* 每当您想在本地创建临时文件时,请选择 `File.createTempFile` 或使用文件夹:`BatchConstants.CFG_KYLIN_LOCAL_TEMP_DIR(/tmp/kylin)`,不要随意使用 + `/tmp` 中的另一个文件夹,它会变得一团糟,看起来不专业。 +* 每当您在本地创建临时文件时,请记得在使用之后删除它。最好使用 `FileUtils.forceDelete`,因为它也适用于删除文件夹。如果 Kylin 异常退出,请尽量避免使用 `deleteOnExit` 方法。 +* 每当您想要在 HDFS 中创建文件,请尝试在 `kylin.hdfs.working.dir` 或 `BatchConstants.CFG_KYLIN_HDFS_TEMP_DIR` 下创建文件,以及记得在它不再有用之后删除它。尽量避免投掷一切到 hdfs:///tmp 并将其留作垃圾。 diff --git a/website/_dev/about_temp_files.md b/website/_dev/about_temp_files.md index b46a764..462c101 100644 --- a/website/_dev/about_temp_files.md +++ b/website/_dev/about_temp_files.md @@ -16,14 +16,6 @@ A ticket was opened to track this issue: For future developments, please: -* Whenever you want to create temp files at Local, choose -File.createTempFile or use the folder: -BatchConstants.CFG_KYLIN_LOCAL_TEMP_DIR(/tmp/kylin), do not randomly use -another folder in /tmp, it will end up a mess, and look unprofessional. -* Whenever you create temp files at Local, remember to delete it after -using it. It's best to use FileUtils.forceDelete, as it also works for -deleting folders. Try avoid deleteOnExit, in case Kylin exits abnormally. -* Whenever you want to create files in HDFS, try to create it under -kylin.hdfs.working.dir or BatchConstants.CFG_KYLIN_HDFS_TEMP_DIR, and -remember to delete it after it is no longer useful. Try avoid throwing -everything into hdfs:///tmp and leave it as garbage. +* Whenever you want to create temp files at Local, choose `File.createTempFile` or use the folder: `BatchConstants.CFG_KYLIN_LOCAL_TEMP_DIR(/tmp/kylin)`, do not randomly use another folder in `/tmp`, it will end up a mess, and look unprofessional. +* Whenever you create temp files at Local, remember to delete it after using it. It's best to use `FileUtils.forceDelete`, as it also works for deleting folders. Try avoid `deleteOnExit`, in case Kylin exits abnormally. +* Whenever you want to create files in HDFS, try to create it under `kylin.hdfs.working.dir` or `BatchConstants.CFG_KYLIN_HDFS_TEMP_DIR`, and remember to delete it after it is no longer useful. Try avoid throwing everything into hdfs:///tmp and leave it as garbage. diff --git a/website/_dev/coding_naming_convention.cn.md b/website/_dev/coding_naming_convention.cn.md index fca6de8..39360e1 100644 --- a/website/_dev/coding_naming_convention.cn.md +++ b/website/_dev/coding_naming_convention.cn.md @@ -24,10 +24,10 @@ permalink: /cn/development/coding_naming_convention.html Kylin 配置名称(在 `kylin.properties` 中的那些) - 惯例是 `dot.separated.namespace.config-name-separated-by-dash`,所有的字符都是小写。 -- 基本原理:点分隔前缀用于命名空间,如 java 包名。最后一级与类名相同,但要小写并以短划线分隔。结果与常见的 hadoop 配置名称一致,即。`dfs.namenode.servicerpc-bind-host`。 -- 正面例子:`kylin.metadata.url`; `kylin.snapshot.max-mb` -- 反面例子:`kylin.cube.customEncodingFactories`,应该为 `kylin.cube.custom-encoding-factories` -- 名称的命名空间(或包)应映射来自配置中使用的 Java 项目和包。 下面是当前名称空间的列表。 +- 基本原理:点分隔前缀用于命名空间,如 java 包名。最后一级与类名相同,但要小写并以短划线分隔。结果与常见的 hadoop 配置名称一致,即 `dfs.namenode.servicerpc-bind-host`。 +- 正面例子:`kylin.metadata.url`, `kylin.snapshot.max-mb`。 +- 反面例子:`kylin.cube.customEncodingFactories`,应该为 `kylin.cube.custom-encoding-factories`。 +- 名称的命名空间(或包)应映射来自配置中使用的 Java 项目和包。 下面是当前名称空间的列表: - kylin.env - kylin.metadata - kylin.snapshot @@ -55,8 +55,8 @@ Kylin 配置名称(在 `kylin.properties` 中的那些) 对于配置文件如日志配置,spring 配置,mapreduce job 配置等。 - 惯例是 `words-separated-by-dash.ext`,所有的字符要小写。 -- 基本原理:要和 hadoop 配置文件命名一致,即。hdfs-site.xml -- 正面例子:`kylin-server-log4j.properties` -- 反面例子:`kylin_hive_conf.xml`,应该为 `kylin-hive-conf.xml` +- 基本原理:要和 hadoop 配置文件命名一致,即 `hdfs-site.xml`。 +- 正面例子:`kylin-server-log4j.properties`。 +- 反面例子:`kylin_hive_conf.xml`,应该为 `kylin-hive-conf.xml`。 diff --git a/website/_dev/coding_naming_convention.md b/website/_dev/coding_naming_convention.md index a4c6ee2..e871218 100644 --- a/website/_dev/coding_naming_convention.md +++ b/website/_dev/coding_naming_convention.md @@ -55,8 +55,8 @@ For Kylin configuration names (those in `kylin.properties`) For configuration files like logging config, spring config, mapreduce job config etc. - The convention is `words-separated-by-dash.ext`, all chars in lower case. -- Rationale: Be consistent with hadoop config file names, i.e. hdfs-site.xml -- Good example: `kylin-server-log4j.properties` -- Bad example: `kylin_hive_conf.xml`, should be `kylin-hive-conf.xml` +- Rationale: Be consistent with hadoop config file names, i.e. `hdfs-site.xml`. +- Good example: `kylin-server-log4j.properties`. +- Bad example: `kylin_hive_conf.xml`, should be `kylin-hive-conf.xml`. diff --git a/website/_dev/datasource_sdk.cn.md b/website/_dev/datasource_sdk.cn.md index 80d6ded..0dd8d70 100644 --- a/website/_dev/datasource_sdk.cn.md +++ b/website/_dev/datasource_sdk.cn.md @@ -8,27 +8,29 @@ permalink: /cn/development/datasource_sdk.html > 自 Apache Kylin v2.6.0 起有效 ## Data source SDK -自 Apache Kylin v2.6.0 起,我们提供一套新的数据源框架 *Data source SDK*,使用框架提供的API, 开发者可以很轻松实现一个新的数据源, 适配sql方言。 +自 Apache Kylin v2.6.0 起,我们提供一套新的数据源框架 *Data source SDK*,使用框架提供的 API,开发者可以很轻松实现一个新的数据源,并且适配 SQL 方言。 ## 如何开发 ### 实现新数据源的配置 -*Data source SDK* 提供转换的机制, 框架里预定义一个配置文件 *default.xml* 对应ansi sql方言。 +*Data source SDK* 提供转换的机制,框架里预定义一个配置文件 *default.xml* 对应 ANSI SQL 方言。 -开发者不需要编码, 只需要为新的数据源新建一个配置文件 *{dialect}.xml*, +开发者不需要编码,只需要为新的数据源新建一个配置文件 *{dialect}.xml*。 -配置文件结构: -* 根节点: +配置文件结构: + +- **根节点:** ``` <DATASOURCE_DEF NAME="kylin" ID="mysql" DIALECT="mysql"/> -``` +``` + +ID 的值通常和配置文件的名字相同。 +DIALECT 的值的定义主要是为了区分不同数据库对于标识符的引用。 +举个例子 Mysql 使用 ``,Microsoft sql server 使用 []。 +Kylin 里定义的 DIALECT 和 Apache Calcite 里定义 DIALECT 的对应关系: -ID的值通常和配置文件的名字相同。 -DIALECT的值的定义主要是为了区分不同数据库对于标识符的引用。 -举个例子 Mysql 使用 ``, Microsoft sql server 使用 []. -Kylin 里定义的DIALECT 和 Apache Calcite 里定义DIALECT 的对应关系: <table> <tbody align="left"> <tr> @@ -91,8 +93,8 @@ Kylin 里定义的DIALECT 和 Apache Calcite 里定义DIALECT 的对应关系: </table> -* 属性节点: -定义方言的属性。 +- **属性节点:** + 定义方言的属性。 <table> <tbody align="left"> @@ -106,19 +108,19 @@ Kylin 里定义的DIALECT 和 Apache Calcite 里定义DIALECT 的对应关系: </tr> <tr> <td> sql.allow-no-offset </td> - <td> 是否允许没有offset字句 </td> + <td> 是否允许没有 offset 字句 </td> </tr> <tr> <td> sql.allow-fetch-no-rows </td> - <td> 是否允许fetch 0 rows</td> + <td> 是否允许 fetch 0 rows</td> </tr> <tr> <td> sql.allow-no-orderby-with-fetch </td> - <td> fetch是否必须跟orderby </td> + <td> fetch 是否必须跟 order by </td> </tr> <tr> <td> sql.keyword-default-escape </td> - <td> <default>是否是关键字 </td> + <td> <default> 是否是关键字 </td> </tr> <tr> <td> sql.keyword-default-uppercase </td> @@ -126,7 +128,7 @@ Kylin 里定义的DIALECT 和 Apache Calcite 里定义DIALECT 的对应关系: </tr> <tr> <td> sql.paging-type </td> - <td> 分页类型比如 LIMIT_OFFSET, FETCH_NEXT, ROWNUM </td> + <td> 分页类型比如 LIMIT_OFFSET,FETCH_NEXT,ROWNUM </td> </tr> <tr> <td> sql.case-sensitive </td> @@ -134,62 +136,62 @@ Kylin 里定义的DIALECT 和 Apache Calcite 里定义DIALECT 的对应关系: </tr> <tr> <td> metadata.enable-cache </td> - <td> 是否开启缓存(针对开启大小写敏感) </td> + <td> 是否开启缓存(针对开启大小写敏感) </td> </tr> <tr> <td> sql.enable-quote-all-identifiers </td> - <td> 是否开启quote </td> + <td> 是否开启 quote </td> </tr> <tr> <td> transaction.isolation-level </td> - <td> 事务隔离级别(针对sqoop) </td> + <td> 事务隔离级别(针对 Sqoop) </td> </tr> </tbody> </table> -* 方法节点: -开发者可以根据数据源方言定义方法的实现。 -比如,我们想要实现 Greenplum 作为数据源,但是 Greenplum 不支持 *TIMESTAMPDIFF* 方法,那我们就可以在 *greenplum.xml* 里面定义 +- **方法节点:** + 开发者可以根据数据源方言定义方法的实现。 + 比如,我们想要实现 Greenplum 作为数据源,但是 Greenplum 不支持 *TIMESTAMPDIFF* 方法,那我们就可以在 *greenplum.xml* 里面定义 : ``` <FUNCTION_DEF ID="64" EXPRESSION="(CAST($1 AS DATE) - CAST($0 AS DATE))"/> ``` -对比在 *default.xml* 定义 +对比在 *default.xml* 定义: ``` <FUNCTION_DEF ID="64" EXPRESSION="TIMESTAMPDIFF(day, $0, $1)"/> ``` -*Data source SDK* 可以把 default 里定义相同 function id 方法转换成目标方言里的定义. +*Data source SDK* 可以把 default 里定义相同 function id 方法转换成目标方言里的定义。 -* 类型节点: -开发者可以根据数据源方言定义数据类型。 -还是拿 Greenplum 作为例子, Greenplum 支持 *BIGINT* 而不是 *LONG*, 那我们可以在 *greenplum.xml* 定义 +- **类型节点:** + 开发者可以根据数据源方言定义数据类型。 + 还是拿 Greenplum 作为例子,Greenplum 支持 *BIGINT* 而不是 *LONG*,那我们可以在 *greenplum.xml* 定义: ``` <TYPE_DEF ID="Long" EXPRESSION="BIGINT"/> ``` -对比在 *default.xml* 定义 +对比在 *default.xml* 定义: ``` <TYPE_DEF ID="Long" EXPRESSION="LONG"/> ``` -*Data source SDK* 可以把 default 里定义相同 type id 方法转换成目标方言里的定义. +*Data source SDK* 可以把 default 里定义相同 type id 方法转换成目标方言里的定义。 ### Adaptor -Adaptor 提供一系列的 API 比如从数据源获取元数据,数据等。 +Adaptor 提供一系列的 API 比如从数据源获取元数据、数据等。 *Data source SDK* 提供了默认的实现,开发者可以创建一个类继承它,并且有自己的实现。 -{% highlight Groff markup %} +``` org.apache.kylin.sdk.datasource.adaptor.DefaultAdaptor -{% endhighlight %} +``` Adaptor 还预留一个方法 *fixSql(String sql)*. -如果根据配置文件转换之后的 sql 还是和目标方言有些适配问题, 开发者可以去实现这个方法做 sql 最后的修改. +如果根据配置文件转换之后的 SQL 还是和目标方言有些适配问题,开发者可以去实现这个方法做 SQL 最后的修改。 ## 部署 @@ -205,7 +207,7 @@ kylin.source.jdbc.connection-url={JDBC 连接字符串} kylin.source.jdbc.driver={JDBC 驱动类名} {% endhighlight %} -使用mysql作为例子: +使用 MySQL 作为例子: {% highlight Groff markup %} kylin.query.pushdown.runner-class-name=org.apache.kylin.query.pushdown.PushdownRunnerSDKImpl kylin.source.default=16 @@ -218,7 +220,7 @@ kylin.source.jdbc.driver=com.mysql.jdbc.Driver {% endhighlight %} 新增加的 *{dialect}.xml* 放置在 $KYLIN_HOME/conf/datasource 目录下。 -新开发的 Adaptor 打成jar包后 放置在在 $KYLIN_HOME/ext 目录下。 +新开发的 Adaptor 打成 jar 包后放置在在 $KYLIN_HOME/ext 目录下。 -其余的配置和更早的jdbc连接方式一致,请参考 [setup_jdbc_datasource](/cn/docs/tutorial/setup_jdbc_datasource.html) +其余的配置和更早的 JDBC 连接方式一致,请参考 [setup_jdbc_datasource](/cn/docs/tutorial/setup_jdbc_datasource.html)。 diff --git a/website/_dev/datasource_sdk.md b/website/_dev/datasource_sdk.md index 94fa310..f37b868 100644 --- a/website/_dev/datasource_sdk.md +++ b/website/_dev/datasource_sdk.md @@ -21,7 +21,7 @@ Developers do not need coding, what they should do is just create a new configur Structure of the configuration: -* Root node: +* **Root node:** ``` <DATASOURCE_DEF NAME="kylin" ID="mysql" DIALECT="mysql"/> @@ -31,6 +31,7 @@ The value of ID is normally the same with configuration file. The value of DIALECT is defined mainly for quote string for database identifier. For example Mysql use ``, Microsoft sql server use []. Mapping of Kylin DIALECT and Apache Calcite Dialect as belows: + <table> <tbody align="left"> <tr> @@ -92,7 +93,7 @@ Mapping of Kylin DIALECT and Apache Calcite Dialect as belows: </tbody> </table> -* Property node: +* **Property node:** Define the properties of the dialect. <table> @@ -149,7 +150,7 @@ Define the properties of the dialect. </table> -* Function node: +* **Function node:** Developers can define the functions implementation in target data source dialect. For example, we want to implement Greenplum as data source, but Greenplum does not support function such as *TIMESTAMPDIFF*, so we can define in *greenplum.xml* @@ -165,7 +166,7 @@ contrast with the configuration in *default.xml* *Data source SDK* provides conversion functions from default to target dialect with same function id. -* Type node: +* **Type node:** Developers can define the types implementation in target data source dialect. Also take Greenplum as example, Greenplum support *BIGINT* instead of *LONG*, so we can define in *greenplum.xml* @@ -221,5 +222,5 @@ kylin.source.jdbc.driver=com.mysql.jdbc.Driver Put the configuration file *{dialect}.xml* under directory $KYLIN_HOME/conf/datasource. Create jar file for the new Adaptor, and put under directory $KYLIN_HOME/ext. -Other configurations are identical with the former jdbc connection, please refer to [setup_jdbc_datasource](/docs/tutorial/setup_jdbc_datasource.html) +Other configurations are identical with the former jdbc connection, please refer to [setup_jdbc_datasource](/docs/tutorial/setup_jdbc_datasource.html). diff --git a/website/_dev/dev_env.cn.md b/website/_dev/dev_env.cn.md index ded3b50..9a64e7e 100644 --- a/website/_dev/dev_env.cn.md +++ b/website/_dev/dev_env.cn.md @@ -12,42 +12,42 @@ permalink: /cn/development/dev_env.html ## Hadoop 客户端环境 Off-Hadoop-CLI 安装需要您有一个有 hadoop 客户端的机器(或一个 hadoop 沙箱)以及本地开发机器。为了简化操作,我们强烈建议您从 hadoop 沙箱上运行 Kylin 开始。在下面的教程中,我们将使用 Hortonworks®Sandbox2.4.0.0-169,您可以从 Hortonworks 下载页面下载它,展开“Hortonworks Sandbox Archive”链接,然后搜索“HDP® 2.4 on Hortonworks Sandbox”进行下载。建议您为沙箱虚拟机提供足够的内存,首选 8G 或更多。 -**提示:**使用HDP-2.4.0.0.169沙箱并使用10GB或者更多内存进行部署会更好。一些新版本的HDP沙箱使用docker部署它们的集群服务并且封装在虚拟机里面。你需要上传你的项目到docker容器中来运行集成测试,这不太方便。更高的内存将减少虚拟机杀掉测试进程的可能性。 +**提示:**使用HDP-2.4.0.0.169 沙箱并使用 10GB 或者更多内存进行部署会更好。一些新版本的 HDP 沙箱使用 Docker 部署它们的集群服务并且封装在虚拟机里面。你需要上传你的项目到 Docker 容器中来运行集成测试,这不太方便。更高的内存将减少虚拟机杀掉测试进程的可能性。 ### 启动 Hadoop -启动完成之后,你可以使用root账户登陆。 +启动完成之后,你可以使用 root 账户登陆。 -在 Hortonworks sandbox 中, ambari 会帮助您运行 hadoop: +在 Hortonworks sandbox 中,ambari 会帮助您运行 hadoop: {% highlight Groff markup %} ambari-agent start ambari-server start {% endhighlight %} -然后重置ambari的admin用户密码为`admin`: +然后重置 ambari 的 admin 用户密码为 `admin`: {% highlight Groff markup %} ambari-admin-password-reset {% endhighlight %} -上述命令执行成功后您可以以admin的身份登陆到 ambari 主页 <http://yoursandboxip:8080> 去检查所有组件的状态。默认情况下 ambari 使 HBase 失效,您需要手动启动 `HBase` 服务。 +上述命令执行成功后您可以以 admin 的身份登陆到 ambari 主页 <http://yoursandboxip:8080> 去检查所有组件的状态。默认情况下 ambari 使 HBase 失效,您需要手动启动 `HBase` 服务。 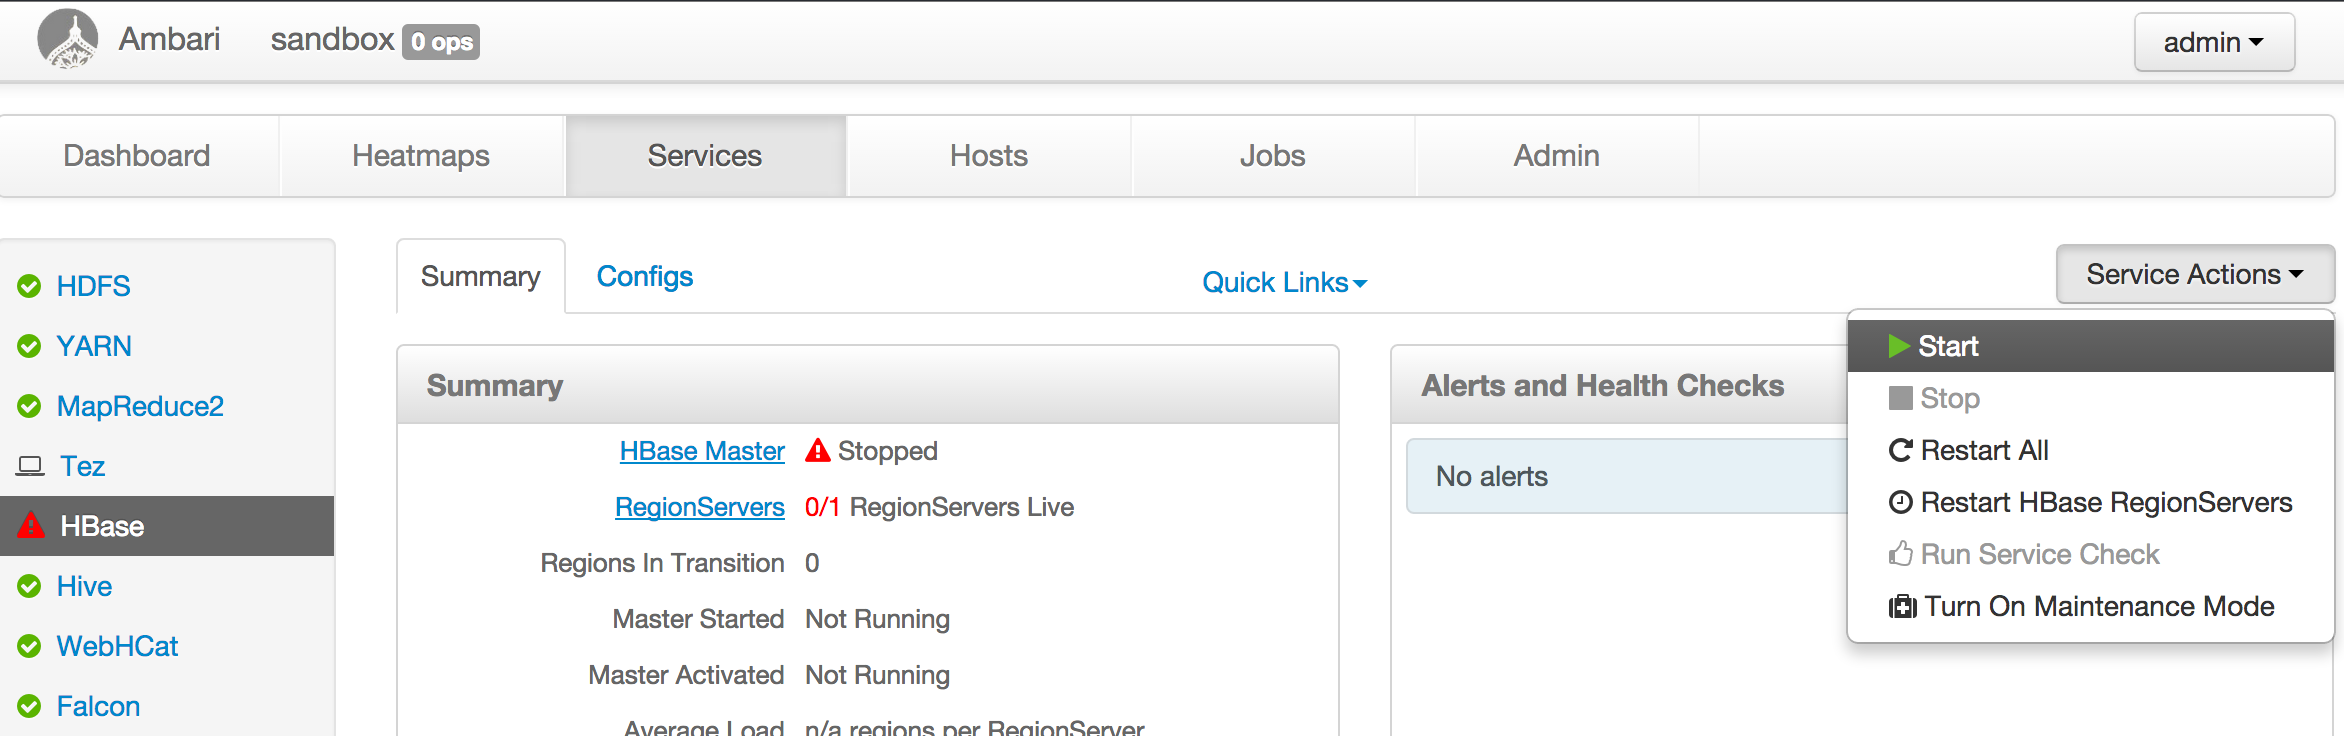 对于 hadoop 分布式,基本上启动 hadoop 集群,确保 HDFS,YARN,Hive,HBase 运行着即可。 注意: -* 为YARN resource manager 分配 3-4GB 内存. -* 升级 Sandbox 里的 Java 到 Java 8 (Kyin 2.5 需要 Java 8). 链接原本的JAVA_HOME指向新的将改变每一个用户的jdk版本。否则,你也许会遇到`UnsupportedClassVersionError`异常. 这里有一些邮件是关于这个问题的: [spark task error occurs when run IT in sanbox](https://lists.apache.org/thread.html/46eb7e4083fd25a461f09573fc4225689e61c0d8150463a2c0eb65ef@%3Cdev.kylin.apache.org%3E) -**Tips:** 这里有一些关于沙箱的教程会有帮助。 [Learning the Ropes of the HDP Sandbox](https://hortonworks.com/tutorial/learning-the-ropes-of-the-hortonworks-sandbox) +* 为 YARN resource manager 分配 3-4GB 内存; +* 升级 Sandbox 里的 Java 到 Java 8(Kyin 2.5 需要 Java 8),链接原本的 JAVA_HOME 指向新的将改变每一个用户的 JDK 版本。否则,你也许会遇到 `UnsupportedClassVersionError` 异常。这里有一些邮件是关于这个问题的:[spark task error occurs when run IT in sanbox](https://lists.apache.org/thread.html/46eb7e4083fd25a461f09573fc4225689e61c0d8150463a2c0eb65ef@%3Cdev.kylin.apache.org%3E); +**提示:** 这里有一些关于沙箱的教程会有帮助。 [Learning the Ropes of the HDP Sandbox](https://hortonworks.com/tutorial/learning-the-ropes-of-the-hortonworks-sandbox) ## 开发机器的环境 ### 安装 Maven -最新的 maven 下载地址:<http://maven.apache.org/download.cgi>,我们创建一个符号,以便 `mvn` 可以在任何地方运行。 +最新的 Maven 下载地址:<http://maven.apache.org/download.cgi>,我们创建一个符号,以便 `mvn` 可以在任何地方运行。 {% highlight Groff markup %} cd ~ @@ -58,7 +58,7 @@ ln -s /root/apache-maven-3.2.5/bin/mvn /usr/bin/mvn ### 安装 Spark -在像 /usr/local/spark 这样的本地文件夹下手动安装 Spark;你需要确认所需要的 Spark 的版本,以及从 Spark 下载页面获取下载链接。 Kylin 2.3 - 2.4 需要 Spark 2.1, Kylin 2.5 需要 Spark 2.3; 例如: +在像 /usr/local/spark 这样的本地文件夹下手动安装 Spark;你需要确认所需要的 Spark 的版本,以及从 Spark 下载页面获取下载链接。 Kylin 2.3 - 2.4 需要 Spark 2.1,Kylin 2.5 需要 Spark 2.3,例如: {% highlight Groff markup %} wget -O /tmp/spark-2.1.2-bin-hadoop2.7.tgz https://archive.apache.org/dist/spark/spark-2.1.2/spark-2.1.2-bin-hadoop2.7.tgz @@ -68,7 +68,7 @@ ln -s spark-2.1.2-bin-hadoop2.7 spark {% endhighlight %} -为 hbase 客户端创建本地临时文件夹(如果其不存在): +为 HBase 客户端创建本地临时文件夹(如果其不存在): {% highlight Groff markup %} mkdir -p /hadoop/hbase/local/jars @@ -83,12 +83,12 @@ chmod 777 /hadoop/hbase/local/jars git clone https://github.com/apache/kylin.git {% endhighlight %} -将 Kylin 工件安装到 maven 仓库: +将 Kylin 工件安装到 Maven 仓库: {% highlight Groff markup %} mvn clean install -DskipTests {% endhighlight %} -如果遇到关于某个插件不存在或是没有找到的错误,请检查pom.xml文件中是否有插件的版本号被注释,并根据注释说明操作。 +如果遇到关于某个插件不存在或是没有找到的错误,请检查 pom.xml 文件中是否有插件的版本号被注释,并根据注释说明操作。 ### 修改本地配置 @@ -104,9 +104,9 @@ mvn clean install -DskipTests * 在 **examples/test_case_data/sandbox** 中 * 遍历每一个 xml 配置文件,找到所有的 `sandbox` 和 `sandbox.hortonworks.com`,替换成您的 hadoop hosts;(如果您使用的是 HDP 沙箱,这步可以跳过) -第二种方式:替换host +第二种方式:替换 host -* 更新您的 `hosts` 文件,将`sandbox` 和 `sandbox.hortonworks.com` 映射为沙箱机器的 IP 。 +* 更新您的 `hosts` 文件,将 `sandbox` 和 `sandbox.hortonworks.com` 映射为沙箱机器的 IP 。 ### 运行单元测试 运行单元测试来测试每一个 classes 基本功能的有效性。 @@ -119,7 +119,7 @@ mvn test -fae -Dhdp.version=<hdp-version> -P sandbox 在真正运行集成测试前,需要为测试数据的填充运行一些端到端的 cube 构建作业,同时验证 cube 过程。然后是集成测试。 其可能需要一段时间(也许两个小时),请保持耐心。 - + {% highlight Groff markup %} mvn verify -fae -Dhdp.version=<hdp-version> -P sandbox {% endhighlight %} @@ -142,7 +142,7 @@ npm install -g bower bower --allow-root install {% endhighlight %} -如果在bower install的过程当中遇到问题,可以尝试命令: +如果在 bower install 的过程当中遇到问题,可以尝试命令: {% highlight Groff markup %} git config --global url."git://".insteadOf https:// @@ -154,7 +154,7 @@ git config --global url."git://".insteadOf https:// bower.cmd --allow-root install {% endhighlight %} -在 IDE,运行 `org.apache.kylin.rest.DebugTomcat`。将工作目录设置为 /server 文件夹,使用 "kylin-server" 的 classpath。在运行之前,请在IDE安装Scala插件,以保证能够编译spark代码。对于 IntelliJ IDEA 2017 或之前的用户,需要修改 "server/kylin-server.iml" 文件,将所有的 "PROVIDED" 替换为 "COMPILE";对于 IntelliJ IDEA 2018 用户,请勾选 “Include dependencies with 'Provided' scope”,否则可能会抛出 "java.lang.NoClassDefFoundError: org/apache/catalina/LifecycleListener" 错误。 +在 IDE,运行 `org.apache.kylin.rest.DebugTomcat`。将工作目录设置为 /server 文件夹,使用 "kylin-server" 的 classpath。在运行之前,请在 IDE 安装 Scala 插件,以保证能够编译 Spark 代码。对于 IntelliJ IDEA 2017 或之前的用户,需要修改 "server/kylin-server.iml" 文件,将所有的 "PROVIDED" 替换为 "COMPILE";对于 IntelliJ IDEA 2018 用户,请勾选 “Include dependencies with 'Provided' scope”,否则可能会抛出 "java.lang.NoClassDefFoundError: org/apache/catalina/LifecycleListener" 错误。 调节 VM options,例如: diff --git a/website/_dev/howto_become_apache_committer.cn.md b/website/_dev/howto_become_apache_committer.cn.md index fa6fd0d..52794f1 100644 --- a/website/_dev/howto_become_apache_committer.cn.md +++ b/website/_dev/howto_become_apache_committer.cn.md @@ -6,9 +6,9 @@ permalink: /cn/development/howto_become_apache_committer.html --- ## 宽泛的标准 -这篇文章将介绍如何成为一名 Apache Committer;简单来说可分为以下几个步骤: +这篇文章将介绍如何成为一名 Apache Committer,简单来说可分为以下几个步骤: -1. 理解和认同 Apache 运作方式和理念 (Apache Way),并以此理念来与其他人协同工作; +1. 理解和认同 Apache 运作方式和理念(Apache Way),并以此理念来与其他人协同工作; 2. 参与项目,可以从贡献文档,回答社区问题(礼貌地),贡献 patch 等做起;到这个时候,你就是一名 contributor 了; 3. 成为开源项目某个模块的专家,能够贡献代码、添加测试案例并不 break 其他人的功能,与其他 committer 良好沟通建立互信; @@ -16,7 +16,7 @@ permalink: /cn/development/howto_become_apache_committer.html 如果做到了上述的全部或大部分,那么接下来就是找到一个项目的 PMC 愿意来提名你为 committer。他需要陈述你的贡献给所有 PMC,并获得至少 3 个 +1 票。 -总之,Apache 强调 “**Community over code**” (社区第一,胜过代码), 你需要在 Kylin 社区树立影响力和发言权,大胆发言,让其他人认可你的贡献,并愿意与你建立信任关系。成为 committer 是一个荣誉与责任共存的事情;成为 committer 不是终点,而是一个更高的起点。 +总之,Apache 强调 “**Community over code**” (社区第一,胜过代码),你需要在 Kylin 社区树立影响力和发言权,大胆发言,让其他人认可你的贡献,并愿意与你建立信任关系。成为 committer 是一个荣誉与责任共存的事情;成为 committer 不是终点,而是一个更高的起点。 参考资料: [https://community.apache.org/contributors/](https://community.apache.org/contributors/) diff --git a/website/_dev/howto_contribute.cn.md b/website/_dev/howto_contribute.cn.md index 1058079..46b2c54 100644 --- a/website/_dev/howto_contribute.cn.md +++ b/website/_dev/howto_contribute.cn.md @@ -11,8 +11,9 @@ Apache Kylin 一直寻求的不只是代码的贡献,还寻求使用文档, ## 源分支 代码和文档都在 Git 源代码控制之下。注意不同分支的用途。 -* `master`: 新功能的主开发分支 -* `2.[n].x`: 一些主要版本的维护分支 +* `master`:新功能的主开发分支 +* `2.[n].x`:一些 2.x 主要版本的维护分支 +* `3.[n].x`:一些 3.x 主要版本的维护分支 * `document`: 文档分支 ## 组件及拥有者 @@ -32,12 +33,12 @@ Apache Kylin 有几个子组件。为了更好地帮助社区的发展,我们 - 如果您认为组件列表需要更新(添加,删除,重命名等),请给 dev 列表写信,我们将对其进行审核。 -组件负责人列在了这个 Apache Kylin [JIRA components page](https://issues.apache.org/jira/projects/KYLIN?selectedItem=com.atlassian.jira.jira-projects-plugin:components-page) 页面中的 Description 字段位置。负责人列在“Description”字段中而不是“Component Lead”字段中,因为后者仅允许我们列出一个人,然而其鼓励组件具有多个负责人。 +组件负责人列在了这个 Apache Kylin [JIRA components page](https://issues.apache.org/jira/projects/KYLIN?selectedItem=com.atlassian.jira.jira-projects-plugin:components-page) 页面中的 Description 字段位置。负责人列在 “Description” 字段中而不是 “Component Lead” 字段中,因为后者仅允许我们列出一个人,然而其鼓励组件具有多个负责人。 ## 选择一个任务 这里有新创建的任务等待被完成,由 JIRA 追踪。为了让其容易被搜索,这里有一些过滤条件。 -* 由李扬管理的[任务列表](https://issues.apache.org/jira/issues/?filter=12339895) 。 +* 由李扬管理的[任务列表](https://issues.apache.org/jira/issues/?filter=12339895)。 * 由 Ted Yu 创建的[任务列表](https://issues.apache.org/jira/issues/?filter=12341496),重要的小的 bugs 且其中一些很容易被修复。 * 您也可以在 Kylin JIRA 中搜索标签 “newbie”。 @@ -61,7 +62,7 @@ Apache Kylin 有几个子组件。为了更好地帮助社区的发展,我们 * 在您的 fork 中进行修改 * 目前没有严格的代码样式,但一般规则与现有文件保持一致。例如,对 java 文件使用 4 空格缩进。 * 尽可能为代码更改添加测试用例。 - * 确保“mvn clean package”和“mvn test”能够获得成功。 + * 确保 “mvn clean package” 和 “mvn test” 能够获得成功。 * 充分的单元测试和集成测试是代码更改的必要部分。 * [运行测试](/cn/development/howto_test.html) 以确保您的更改质量良好且不会破坏任何内容。如果您的补丁生成不正确或您的代码不符合代码指南,则可能会要求您重做某些工作。 * 生成补丁并将其附加到相关的 JIRA。 @@ -89,7 +90,7 @@ $ ./dev-support/submit-patch.py -jid KYLIN-xxxxx -b master -srb * _性能_:改变不应该降低 Kylin 的性能。 * _元数据兼容性_:更改应支持旧元数据定义。否则,需要元数据迁移工具和文档。 * _API 兼容性_:更改不应该破坏公共 API 的功能和行为;如果需要用新 API 替换旧 API,请在那里打印警告消息。 -* _文档_:如果需要同时更新 Kylin 文档,请创建另一个 JIRA,并将“Document”作为要跟踪的组件。在 JIRA 文档中,附加“文档”分支的文档更改 patch。 +* _文档_:如果需要同时更新 Kylin 文档,请创建另一个 JIRA,并将 “Document” 作为要跟踪的组件。在 JIRA 文档中,附加 “文档” 分支的文档更改 patch。 不符合上述规则的补丁可能无法合并。 @@ -97,20 +98,20 @@ $ ./dev-support/submit-patch.py -jid KYLIN-xxxxx -b master -srb 在提交之前,适合单个组件范围的修补程序至少需要一个组件负责人的 +1。如果负责人不在 — 在忙或其他 — 两个非负责人(即两个提交者)的 +1,就足够了。 -跨组件的 patch 在提交之前至少需要两个 +1s,最好由 x-component patch 涉及的组件负责人的 +1。 +跨组件的 patch 在提交之前至少需要两个 +1,最好由 x-component patch 涉及的组件负责人的 +1。 任何人都可以在 patch 上 -1,任何 -1 都可以否决补丁;在解决 -1 的理由之前,它不能被提交。 ## 应用 Patch -* Committer 将审核 JIRA 中的 Pull Requests 和 Patches 的正确性,性能,设计,编码风格,测试覆盖率 +* Committer 将审核 JIRA 中的 Pull Requests 和 Patches 的正确性,性能,设计,编码风格,测试覆盖率; * 必要时进行讨论和修改; -* committer 将代码合并到目标分支中 - * 对于 git patch,请使用“git am -s -3 patch-file”命令进行应用; - * 如果是来自 github Pull Request,则需要添加“This closing#”作为提交消息的一部分。这将允许 ASF Git bot 关闭 PR。 +* Committer 将代码合并到目标分支中 + * 对于 git patch,请使用 “git am -s -3 patch-file” 命令进行应用; + * 如果是来自 github Pull Request,则需要添加 “This closing#” 作为提交消息的一部分。这将允许 ASF Git bot 关闭 PR; * 使用 `git rebase` 确保合并结果是提交的简化。 ## 进行文档更改 -查看[如何写文档](/cn/development/howto_docs.html). +查看[如何写文档](/cn/development/howto_docs.html)。 diff --git a/website/_dev/howto_contribute.md b/website/_dev/howto_contribute.md index 4eb7a9a..7908e33 100644 --- a/website/_dev/howto_contribute.md +++ b/website/_dev/howto_contribute.md @@ -12,7 +12,8 @@ Apache Kylin is always looking for contributions of not only code, but also usag Both code and document are under Git source control. Note the purpose of different branches. * `master`: Main development branch for new features -* `2.[n].x`: Maintenance branch for a certain major release +* `2.[n].x`: Maintenance branch for a certain major release for v2.x +* `3.[n].x`: Maintenance branch for a certain major release for v3.x * `document`: Document branch ## Components and owners @@ -55,7 +56,7 @@ If create a new JIRA for bug or feature, remember to provide enough information * Affected version: which Kylin you're using. ## Making Code Changes -* [Setup dev env](/development/dev_env.html) +* [Setup development environment](/development/dev_env.html) * Raise a JIRA, describe the feature/enhancement/bug * Discuss with others in mailing list or issue comments, make sure the proposed changes fit in with what others are doing and have planned for the project * Make changes in your fork @@ -103,11 +104,11 @@ Any -1 on a patch by anyone vetoes a patch; it cannot be committed until the jus ## Apply Patch -* Committer will review Pull Requests and Patches in JIRA regarding correctness, performance, design, coding style, test coverage +* Committer will review Pull Requests and Patches in JIRA regarding correctness, performance, design, coding style, test coverage; * Discuss and revise if necessary; * Finally committer merge code into target branch * For a git patch, use "git am -s -3 patch-file" command to apply; - * If it is from a github Pull Request, need add "This closes #<PR NUMBER>" as part of the commit messages. This will allow ASF Git bot to close the PR. + * If it is from a github Pull Request, need add "This closes #<PR NUMBER>" as part of the commit messages. This will allow ASF Git bot to close the PR; * Use `git rebase` to ensure the merged result is a streamline of commits. diff --git a/website/_dev/howto_hbase_branches.cn.md b/website/_dev/howto_hbase_branches.cn.md index 9605dab..18cc673 100644 --- a/website/_dev/howto_hbase_branches.cn.md +++ b/website/_dev/howto_hbase_branches.cn.md @@ -9,13 +9,13 @@ permalink: /cn/development/howto_hbase_branches.html 因为 HBase API 基于版本和供应商的不同,因此必须针对不同的 HBase 版本维护不同的代码分支。 -分支设计为 +分支设计为: - `master` 分支编译的是 HBase 1.1,也是开发的主要分支。 所有错误修复和新功能仅提交给 `master`。 -- `master-hadoop3.1` 分支编译的是 Hadoop 3.1 + HBase 2.x。通过在 `master` 上应用若干个 patch 来创建此分支。换句话说,`master-hadoop3.1` = `master` + `patches to support HBase 2.x`. -- The `master-hbase0.98` 已经弃之不用,0.98用户建议升级HBase; -- 另外有若干个Kylin版本维护分支,如2.5.x, 2.4.x 等;如果你提了一个patch或Pull request, 请告知 reviewer 哪几个版本需要此patch, reviewer 会把 patch 合并到除master以外的其它分支; -- 在 `master-hadoop3.1` 上不会直接发生代码更改(除非分支上最后一次提交采用了 HBase 调用)。 +- `master-hadoop3.1` 分支编译的是 Hadoop 3.1 + HBase 2.x。通过在 `master` 上应用若干个 patch 来创建此分支。换句话说,`master-hadoop3.1` = `master` + `patches to support HBase 2.x`。 +- `master-hbase0.98` 已经弃之不用,0.98 用户建议升级 HBase。 +- 另外有若干个 Kylin 版本维护分支,如 2.5.x,2.4.x 等;如果你提了一个 patch 或 Pull Request,请告知 reviewer 哪几个版本需要此 patch, reviewer 会把 patch 合并到除 master 以外的其它分支。 +- 在 `master-hadoop3.1` 上不会直接发生代码更改(除非分支上最后一次提交采用了 HBase 调用)。 有一个脚本有助于保持这些分支同步:`dev-support/sync_hbase_cdh_branches.sh`。 diff --git a/website/_dev/howto_release.cn.md b/website/_dev/howto_release.cn.md index 78f9c79..e80bf93 100644 --- a/website/_dev/howto_release.cn.md +++ b/website/_dev/howto_release.cn.md @@ -12,71 +12,71 @@ _对于中国用户,请谨慎使用代理以避免潜在的防火墙问题。_ ## 建立账户 确保您有可使用的账号且对以下应用有权限: -* Apache 账户: [https://id.apache.org](https://id.apache.org/) -* Apache Kylin git repo (main cobe base): [https://github.com/apache/kylin](https://github.com/apache/kylin) -* Apache Kylin svn 仓库 (只针对网站): [https://svn.apache.org/repos/asf/kylin](https://svn.apache.org/repos/asf/kylin) -* Apache Nexus (maven 仓库): [https://repository.apache.org](https://repository.apache.org) -* Apache Kylin dist 仓库: [https://dist.apache.org/repos/dist/dev/kylin](https://dist.apache.org/repos/dist/dev/kylin) +* Apache 账户:[https://id.apache.org](https://id.apache.org/) +* Apache Kylin git repo (main cobe base): [https://github.com/apache/kylin](https://github.com/apache/kylin) +* Apache Kylin svn 仓库(只针对网站):https://svn.apache.org/repos/asf/kylin](https://svn.apache.org/repos/asf/kylin) +* Apache Nexus (maven 仓库):[https://repository.apache.org](https://repository.apache.org) +* Apache Kylin dist 仓库:[https://dist.apache.org/repos/dist/dev/kylin](https://dist.apache.org/repos/dist/dev/kylin) ## 软件要求 -* Java 8 or above; -* Maven 3.5.3 或更高版本。 -* 如果你是用 Mac OS X 做发布, 请安装 GNU TAR, 按照 [此文章](http://macappstore.org/gnu-tar/). +* Java 8 或更高版本; +* Maven 3.5.3 或更高版本; +* 如果你是用 Mac OS X 做发布,请按照[此文章](http://macappstore.org/gnu-tar/)安装 GNU TAR。 ## 设置 GPG 签名密钥 按照 [http://www.apache.org/dev/release-signing](http://www.apache.org/dev/release-signing) 上的说明创建密钥对 -安装 gpg (以 Mac OS X 为例): +安装 gpg(以 Mac OS X 为例): `brew install gpg` -生成 gpg 密钥: +生成 gpg 密钥: 参考: [https://www.gnupg.org/gph/en/manual/c14.html](https://www.gnupg.org/gph/en/manual/c14.html) _生成的所有新 RSA 密钥应至少为 4096 位。不要生成新的 DSA 密钥_ `gpg --full-generate-key` -验证您的密钥: +验证您的密钥: `gpg --list-sigs YOUR_NAME` -获取密钥的指纹: +获取密钥的指纹: `gpg --fingerprint YOUR_NAME` -它将显示指纹,如 "Key fingerprint = XXXX XXXX ...",然后在 [https://id.apache.org/](https://id.apache.org/) 上的"OpenPGP Public Key Primary Fingerprint"字段处将指纹添加到您的 apache 帐户;等待几个小时,密钥将添加到 [https://people.apache.org/keys/](https://people.apache.org/keys/),例如: +它将显示指纹,如 "Key fingerprint = XXXX XXXX ...",然后在 [https://id.apache.org/](https://id.apache.org/) 上的 "OpenPGP Public Key Primary Fingerprint" 字段处将指纹添加到您的 apache 帐户;等待几个小时,密钥将添加到 [https://people.apache.org/keys/](https://people.apache.org/keys/),例如: [https://people.apache.org/keys/committer/lukehan.asc](https://people.apache.org/keys/committer/lukehan.asc) -生成 ASCII Amromed 键: +生成 ASCII Amromed 键: `gpg -a --export YOUR_MAIL_ADDRESS > YOUR_NAME.asc &` -上传密钥到公共服务器: +上传密钥到公共服务器: `gpg --send-keys YOUR_KEY_HASH` -或通过 web 提交密钥: -打开并提交到 [http://pool.sks-keyservers.net:11371](http://pool.sks-keyservers.net:11371) (您可以选择任意一个有效的公钥服务器) +或通过 web 提交密钥: +打开并提交到 [http://pool.sks-keyservers.net:11371](http://pool.sks-keyservers.net:11371)(您可以选择任意一个有效的公钥服务器) -一旦您的密钥提交到服务器,您可以通过使用以下命令验证: +一旦您的密钥提交到服务器,您可以通过使用以下命令验证: `gpg --recv-keys YOUR_KEY_HASH` -举例: +举例: `gpg --recv-keys 027DC364` -按照 KEYS 文件中的说明将公钥添加到 KEYS 文件: -_KEYS 文件位于:_ __${kylin}/KEYS__ -例如: +按照 KEYS 文件中的说明将公钥添加到 KEYS 文件: +_KEYS 文件位于:_ __${kylin}/KEYS__ +例如: `(gpg --list-sigs YOURNAME && gpg --armor --export YOURNAME) >> KEYS` 提交您的改动。 ## 准备 release 的工件 -__开始前:__ +__开始前:__ * 如上所述设置签名密钥。 * 确保您使用的是 JDK 1.8。 * 确保您使用的是 GIT 2.7.2 或更高版本。 * 确保您使用的是正确的 release 版本号。 -* 确保每个“resolved”的 JIRA 案例(包括重复案例)都分配了修复版本。 -* 确保你在干净的目录工作 +* 确保每个 “resolved” 的 JIRA 案例(包括重复案例)都分配了修复版本。 +* 确保你在干净的目录工作。 __在 Maven 中配置 Apache 存储库服务器__ -如果您是第一次发布,您需要在 ~/.m2/settings.xml 中服务器授权信息;如果该文件不存在,从 $M2_HOME/conf/settings.xml 拷贝一个模板; +如果您是第一次发布,您需要在 ~/.m2/settings.xml 中服务器授权信息;如果该文件不存在,从 $M2_HOME/conf/settings.xml 拷贝一个模板; -在“服务器”部分中,确保添加以下服务器,并将 #YOUR_APACHE_ID#, #YOUR_APACHE_PWD#, #YOUR_GPG_PASSPHRASE# 替换为您的 ID,密码和口令: +在 “服务器” 部分中,确保添加以下服务器,并将 #YOUR_APACHE_ID#, #YOUR_APACHE_PWD#, #YOUR_GPG_PASSPHRASE# 替换为您的 ID,密码和口令: {% highlight bash %} <servers> <!-- To publish a snapshot of some part of Maven --> @@ -92,6 +92,7 @@ __在 Maven 中配置 Apache 存储库服务器__ <password>#YOUR_APACHE_PWD#</password> </server> + <!-- To publish a website of some part of Maven --> <server> <id>apache.website</id> @@ -121,19 +122,20 @@ __在 Maven 中配置 Apache 存储库服务器__ __修复许可证问题__ {% highlight bash %} -# Set passphrase variable without putting it into shell history + +# 设置密码变量而不将其放入shell历史记录中 $ read -s GPG_PASSPHRASE -# Make sure that there are no junk files in the sandbox +# 确保沙箱中没有垃圾文件 $ git clean -xf $ mvn clean -# Make sure all unit tests are passed +# 确保所有单元测试均通过 $ mvn test -# Check the `org.apache.kylin.common.KylinVersion` class, ensure the value of `CURRENT_KYLIN_VERSION` is the release version. +# 检查 `org.apache.kylin.common.KylinVersion` 类,确保 `CURRENT_KYLIN_VERSION`的值是发行版本 -# Fix any license issues as reported by target/rat.txt +# 修复 target / rat.txt 报告的所有许可证问题 $ mvn -Papache-release -DskipTests -Dgpg.passphrase=${GPG_PASSPHRASE} install {% endhighlight %} @@ -148,7 +150,7 @@ __准备__ ssh -T [email protected] {% endhighlight %} -基于要当前的开发分支,创建一个以 release 版本号命名的发布分支,例如,v2.5.0-release (注意分支名字不能与tag名字相同),并将其推到服务器端。 +基于要当前的开发分支,创建一个以 release 版本号命名的发布分支,例如,v2.5.0-release(注意分支名字不能与 tag 名字相同),并将其推到服务器端。 {% highlight bash %} $ git checkout -b vX.Y.Z-release $ git push -u origin vX.Y.Z-release @@ -156,14 +158,14 @@ $ git push -u origin vX.Y.Z-release 如果任何步骤失败,请清理(见下文),解决问题,然后从头重新开始。 {% highlight bash %} -# Set passphrase variable without putting it into shell history +# 设置密码变量而不将其放入shell历史记录中 $ read -s GPG_PASSPHRASE -# Make sure that there are no junk files in the sandbox +# 确保沙箱中没有垃圾文件 $ git clean -xf $ mvn clean -# 可选的, do a dry run of the release:prepare step, which sets version numbers. +# (可选的)试运行 release:准备步骤,该步骤设置版本号 $ mvn -DdryRun=true -DskipTests -DreleaseVersion=X.Y.Z -DdevelopmentVersion=(X.Y.Z+1)-SNAPSHOT -Papache-release -Darguments="-Dgpg.passphrase=${GPG_PASSPHRASE} -DskipTests" release:prepare 2>&1 | tee /tmp/prepare-dry.log {% endhighlight %} @@ -174,38 +176,36 @@ __查看 dry run 输出:__ * apache-kylin-X.Y.Z-SNAPSHOT-source-release.zip.asc * apache-kylin-X.Y.Z-SNAPSHOT-source-release.zip.asc.sha256 * apache-kylin-X.Y.Z-SNAPSHOT-source-release.zip.sha256 -* 移除 .zip.asc.sha256 文件因为不需要。 +* 移除 .zip.asc.sha256 文件因为不需要 * 注意文件名以 `apache-kylin-` 开始 -* 在源发行版 `.zip` 文件中,检查所有文件是否属于名为 `apache-kylin-X.Y.Z-SNAPSHOT` 的目录。 -* 该目录必须包含 `NOTICE`, `LICENSE`, `README.md` 文件 +* 在源发行版 `.zip` 文件中,检查所有文件是否属于名为 `apache-kylin-X.Y.Z-SNAPSHOT` 的目录 +* 该目录必须包含 `NOTICE`,`LICENSE`,`README.md` 文件 * 按[此](https://httpd.apache.org/dev/verification.html)检查 PGP。 -__运行真实的 release:__ +__运行真实的 release:__ 现在真正开始 release {% highlight bash %} -# 如果之前做了dry run,在真正开始release之前需要做清理 -# Prepare sets the version numbers, creates a tag, and pushes it to git. +# 如果之前做了dry run,在真正开始 release 之前需要做清理 +# 准备设置版本号,创建 tag,并将其推送到git $ mvn -DskipTests -DreleaseVersion=X.Y.Z -DdevelopmentVersion=(X.Y.Z+1)-SNAPSHOT -Papache-release -Darguments="-Dgpg.passphrase=${GPG_PASSPHRASE} -DskipTests" release:prepare -# Perform checks out the tagged version, builds, and deploys to the staging repository +# 挑选出标记的版本,构建并部署到登台存储库 $ mvn -DskipTests -Papache-release -Darguments="-Dgpg.passphrase=${GPG_PASSPHRASE} -DskipTests" release:perform {% endhighlight %} -__一个失败的 release 尝试后进行清理:__ +__一个失败的 release 后进行清理:__ {% highlight bash %} -# Make sure that the tag you are about to generate does not already -# exist (due to a failed release attempt) +# 确保您要生成的 tag 不存在(由于一个失败的发布) $ git tag -# If the tag exists, delete it locally and remotely +# 如果 tag 存在,请在本地和远程删除它 $ git tag -d kylin-X.Y.Z $ git push origin :refs/tags/kylin-X.Y.Z -# Remove modified files +# 删除修改的文件 $ mvn release:clean -# Check whether there are modified files and if so, go back to the -# original git commit +# 检查是否有修改的文件,如果有,请返回原始的 git commit $ git status $ git reset --hard HEAD {% endhighlight %} @@ -223,29 +223,29 @@ __关闭 Nexus 仓库中的阶段性工件:__ __上传到临时区域:__ 通过 subversion 将工件上传到临时区域,https://dist.apache.org/repos/dist/dev/kylin/apache-kylin-X.Y.Z-rcN: {% highlight bash %} -# Create a subversion workspace, if you haven't already +# 创建 subversion 工作区(如果尚未创建) $ mkdir -p ~/dist/dev $ pushd ~/dist/dev $ svn co https://dist.apache.org/repos/dist/dev/kylin $ popd -## Move the files into a directory +# 将文件移到目录中 $ cd target $ mkdir ~/dist/dev/kylin/apache-kylin-X.Y.Z-rcN $ mv apache-kylin-* ~/dist/dev/kylin/apache-kylin-X.Y.Z-rcN -## Remove the .zip.asc.sha256 file as it is not needed. +# 删除 .zip.asc.sha256 文件,因为它不再需要 $ rm ~/dist/dev/kylin/apache-kylin-X.Y.Z-rcN/apache-kylin-X.Y.Z-SNAPSHOT-source-release.zip.asc.sha256 -## Check in +# Check in $ cd ~/dist/dev/kylin $ svn add apache-kylin-X.Y.Z-rcN $ svn commit -m 'Upload release artifacts to staging' --username <YOUR_APACHE_ID> {% endhighlight %} -# 验证 release +## 验证 release {% highlight bash %} -# Check unit test +# 检查单元测试 $ mvn test # Check that the signing key (e.g. 2AD3FAE3) is pushed @@ -254,8 +254,7 @@ $ gpg --recv-keys key # Check keys $ curl -O https://dist.apache.org/repos/dist/release/kylin/KEYS -# Sign/check sha256 hashes -# (Assumes your O/S has a 'shasum' command.) +# Sign/check sha256 hashes(假设您的操作系统具有“ shasum”命令) function checkHash() { cd "$1" for i in *.{pom,gz}; do @@ -357,11 +356,7 @@ Apache-Kylin-X.Y.Z has passed. ## 发布 成功发布投票后,我们需要推动发行到镜像,以及其它任务。 -在 JIRA 中,搜索 -[all issues resolved in this release](https://issues.apache.org/jira/issues/?jql=project%20%3D%20KYLIN%20), -并进行批量更新,将它们的状态更改为“关闭”, -并加上更改的评论 -"Resolved in release X.Y.Z (YYYY-MM-DD)" +在 JIRA 中,搜索 [all issues resolved in this release](https://issues.apache.org/jira/issues/?jql=project%20%3D%20KYLIN%20),并进行批量更新,将它们的状态更改为 "关闭",并加上更改的评论 "Resolved in release X.Y.Z (YYYY-MM-DD)" (填写适当的发布号和日期)。 __取消 "Send mail for this update"。__ @@ -376,12 +371,12 @@ __取消 "Send mail for this update"。__ 将工件检入 svn。 {% highlight bash %} -# Get the release candidate. +# 获取候选版本 $ mkdir -p ~/dist/dev $ cd ~/dist/dev $ svn co https://dist.apache.org/repos/dist/dev/kylin -# Copy the artifacts. Note that the copy does not have '-rcN' suffix. +# 复制工件,请注意,副本没有后缀 '-rcN' $ mkdir -p ~/dist/release $ cd ~/dist/release $ svn co https://dist.apache.org/repos/dist/release/kylin @@ -390,7 +385,7 @@ $ mkdir apache-kylin-X.Y.Z $ cp -rp ../../dev/kylin/apache-kylin-X.Y.Z-rcN/apache-kylin* apache-kylin-X.Y.Z/ $ svn add apache-kylin-X.Y.Z -# Check in. +# Check in svn commit -m 'checkin release artifacts' {% endhighlight %} @@ -406,14 +401,14 @@ svn rm apache-kylin-X.Y.Z svn commit -m 'Remove old release' {% endhighlight %} -旧版本将保留在 [release archive](http://archive.apache.org/dist/kylin/). +旧版本将保留在 [release archive](http://archive.apache.org/dist/kylin/)。 在 JIRA 中发布相同版本,检查最新发布版本的更改日志。 ## 构建和上传二进制包 -发布后,您需要生成二进制包并将它们放入到 VPN 发布库中; +发布后,您需要生成二进制包并将它们放入到 VPN 发布库中: -* 使用 `git fetch --all --prune --tags` 来同步您本地和远程的仓库。 +* 使用 `git fetch --all --prune --tags` 来同步您本地和远程的仓库; * Git 检出当前发布的标签; * 通过参考[此文档](howto_package.html)制作二进制包; * 使用 gpg 对生成的二进制包进行签名,例如: @@ -427,7 +422,7 @@ svn commit -m 'Remove old release' on Linux: openssl sha256 apache-kylin-2.5.0-bin.tar.gz > apache-kylin-2.5.0-bin.tar.gz.sha256 {% endhighlight %} -* 将二进制包,签名文件和 sha256 文件推送到 svn __dev__ 仓库,然后运行 `svn mv <files-in-dev> <files-in-release>` 命令将他们移动到 svn __release__ 仓库。 +* 将二进制包,签名文件和 sha256 文件推送到 svn __dev__ 仓库,然后运行 `svn mv <files-in-dev> <files-in-release>` 命令将他们移动到 svn __release__ 仓库; * 对于不同的 Hadoop/HBase 版本,您可能需要上述步骤; * 添加文件,然后将更改提交 svn。 @@ -435,7 +430,7 @@ svn commit -m 'Remove old release' ## 更新源码 发布后,您需要更新一些源代码: -* 把分布分支,如v2.5.0-release,合并到开发分支中,如2.5.x,以便开始下个版本的开发。 +* 把分布分支,如 v2.5.0-release,合并到开发分支中,如 2.5.x,以便开始下个版本的开发。 * 手动更新 `KylinVersion` 类,将 `CURRENT_KYLIN_VERSION` 的值更改为当前开发版本。 @@ -445,10 +440,10 @@ svn commit -m 'Remove old release' ## 发送通知邮件到邮件列表 发送一个邮件主题如 "[Announce] Apache Kylin x.y.z released" 到以下列表: -* Apache Kylin Dev 邮箱列表: [email protected] -* Apache Kylin User 邮箱列表: [email protected] -* Apache Announce 邮箱列表: [email protected] - 请注意始终使用您的 Apache 邮件地址发送; +* Apache Kylin Dev 邮箱列表:[email protected] +* Apache Kylin User 邮箱列表:[email protected] +* Apache Announce 邮箱列表:[email protected] + 请注意始终使用您的 Apache 邮件地址发送; 这是一个公告电子邮件的样本(通过研究 Kafka): @@ -475,6 +470,6 @@ https://kylin.apache.org/ {% endhighlight %} -# 感谢 +## 感谢 本指南起草于 [Apache Calcite](http://calcite.apache.org) Howto doc 的参考资料,非常感谢。 diff --git a/website/_dev/howto_release.md b/website/_dev/howto_release.md index 2548eac..98fb437 100644 --- a/website/_dev/howto_release.md +++ b/website/_dev/howto_release.md @@ -71,7 +71,7 @@ __Before you start:__ * Make sure you are using GIT 2.7.2 or above. * Make sure you are working on right release version number. * Make sure that every “resolved” JIRA case (including duplicates) has a fix version assigned. -* Make sure you are working in clean dir +* Make sure you are working in clean dir. __Configure Apache repository server in Maven__ If you're the first time to do release, you need update the server authentication information in ~/.m2/settings.xml; If this file doesn't exist, copy a template from $M2_HOME/conf/settings.xml; @@ -121,19 +121,19 @@ In the "servers" section, make sure the following servers be added, and replace __Fix license issues__ {% highlight bash %} -# Set passphrase variable without putting it into shell history +Set passphrase variable without putting it into shell history $ read -s GPG_PASSPHRASE -# Make sure that there are no junk files in the sandbox +Make sure that there are no junk files in the sandbox $ git clean -xf $ mvn clean -# Make sure all unit tests are passed +Make sure all unit tests are passed $ mvn test -# Check the `org.apache.kylin.common.KylinVersion` class, ensure the value of `CURRENT_KYLIN_VERSION` is the release version. +Check the `org.apache.kylin.common.KylinVersion` class, ensure the value of `CURRENT_KYLIN_VERSION` is the release version. -# Fix any license issues as reported by target/rat.txt +Fix any license issues as reported by target/rat.txt $ mvn -Papache-release -DskipTests -Dgpg.passphrase=${GPG_PASSPHRASE} install {% endhighlight %} @@ -157,14 +157,14 @@ $ git push -u origin vX.Y.Z-release If any of the steps fail, clean up (see below), fix the problem, and start again from the top. {% highlight bash %} -# Set passphrase variable without putting it into shell history +Set passphrase variable without putting it into shell history $ read -s GPG_PASSPHRASE -# Make sure that there are no junk files in the sandbox +Make sure that there are no junk files in the sandbox $ git clean -xf $ mvn clean -# Optionally, do a dry run of the release:prepare step, which sets version numbers. e.g. releaseVersion=2.5.0, developmentVersion=2.5.1-SNAPSHOT, use default tag kylin-2.5.0 +Optionally, do a dry run of the release:prepare step, which sets version numbers. e.g. releaseVersion=2.5.0, developmentVersion=2.5.1-SNAPSHOT, use default tag kylin-2.5.0 $ mvn -DdryRun=true -DskipTests -DreleaseVersion=X.Y.Z -DdevelopmentVersion=(X.Y.Z+1)-SNAPSHOT -Papache-release -Darguments="-Dgpg.passphrase=${GPG_PASSPHRASE} -DskipTests" release:prepare 2>&1 | tee /tmp/prepare-dry.log {% endhighlight %} @@ -245,7 +245,7 @@ $ git status $ git reset --hard HEAD {% endhighlight %} -# Validate a release +## Validate a release {% highlight bash %} # Check unit test $ mvn test @@ -480,6 +480,6 @@ https://kylin.apache.org/ {% endhighlight %} -# Thanks +## Thanks This guide drafted with reference from [Apache Calcite](http://calcite.apache.org) Howto doc, Thank you very much. diff --git a/website/_dev/howto_test.cn.md b/website/_dev/howto_test.cn.md index 9b313c5..409a00b 100644 --- a/website/_dev/howto_test.cn.md +++ b/website/_dev/howto_test.cn.md @@ -10,7 +10,7 @@ permalink: /cn/development/howto_test.html ## 测试 v1.5 及以上 * `mvn clean test` 运行单元测试,它的测试覆盖范围有限。 - * 单元测试没有额外的依赖且能在任何机器上运行 + * 单元测试没有额外的依赖且能在任何机器上运行。 * 单元测试不覆盖端到端的场景,如构建,合并和查询。 * 单元测试只需几分钟即可完成。 * `dev-support/test_all_against_hdp_2_4_0_0_169.sh` 运行集成测试,有很好的覆盖率。 @@ -22,10 +22,10 @@ permalink: /cn/development/howto_test.html ## 更多关于 V1.5 UT/IT 分离 -运行 `mvn verify -Dhdp.version=2.4.0.0-169` (假定您运行在 HDP 2.4 沙箱上) 是运行完整的所有测试套件所需的全部内容。 +运行 `mvn verify -Dhdp.version=2.4.0.0-169` (假定您运行在 HDP 2.4 沙箱上)是运行完整的所有测试套件所需的全部内容。 它将按顺序执行以下步骤: - + 1. Build Artifacts 2. Run all UTs (takes few minutes) 3. Provision Cubes on the sandbox environment for IT uasge (takes 1~2 hours) @@ -40,6 +40,6 @@ permalink: /cn/development/howto_test.html ### Cube 配置 -测试用的 cube 配置确实会运行 kylin cube 作业,以在沙箱中准备样例 cube。这些准备好的 cubes 将会被集成测试使用,当前准备步骤与 maven 预集成测试阶段绑定,且其包含运行 BuildCubeWithEngine(需要 HBase),BuildCubeWithStream(需要 Kafka)。您可以在沙箱或进行开发的计算机中运行 mvn 命令。对于后者情况您需要在 __$KYLIN_HOME/examples/test_case_data/sandbox/kylin.properties__ 中设置 kylin.job.use-remote-cli=true。 +测试用的 cube 配置确实会运行 kylin cube 作业,以在沙箱中准备样例 cube。这些准备好的 cubes 将会被集成测试使用,当前准备步骤与 maven 预集成测试阶段绑定,且其包含运行 BuildCubeWithEngine(需要 HBase),BuildCubeWithStream(需要 Kafka)。您可以在沙箱或进行开发的计算机中运行 mvn 命令。对于后者情况您需要在 __$KYLIN_HOME/examples/test_case_data/sandbox/kylin.properties__ 中设置 kylin.job.use-remote-cli=true。 尝试将 `-DfastBuildMode=true` 附加到 mvn verify 命令,通过跳过增量 Cubing 来加速配置。 diff --git a/website/_dev/new_metadata.cn.md b/website/_dev/new_metadata.cn.md index 8fe616e..839b841 100644 --- a/website/_dev/new_metadata.cn.md +++ b/website/_dev/new_metadata.cn.md @@ -9,22 +9,22 @@ Kylin 正在进行循环代码重构,它将对元数据引入以下两个更 * 从 "cube_desc" 抽象一个 "model_desc" 层 -定义一个 cube 前,用户将需要首先定义一个模型("model_desc");模型定义了哪个是事实表,哪些是维度表以及它们是如何 join 的; + 定义一个 cube 前,用户将需要首先定义一个模型("model_desc");模型定义了哪个是事实表,哪些是维度表以及它们是如何 join 的; -在定义模型时,当用户定义 cube(“cube_desc”)时,他/她只需要为维度指定表/列名称,因为已经定义了 join 条件; + 定义模型之后,当用户定义 cube(“cube_desc”)时,他/她只需要为维度指定表/列名称,因为已经定义了 join 条件; -这种抽象是扩展元数据以实现非 cube 查询(即将推出); + 这种抽象是扩展元数据以实现非 Cube 查询(即将推出); -* 支持来自多个 hive 数据库的数据表; +* 支持来自多个 Hive 数据库的数据表 -用户有这样的场景:表来自多个 hive 数据库,表名可能相同;为了支持这种情况,Kylin 将使用数据库名称 + 表名作为表的唯一名称;并且当在 Kylin 中查询时,用户需要在 SQL 中指定数据库名称(如果它不是“default”)。 + 用户有这样的场景:表来自多个 Hive 数据库,表名可能相同;为了支持这种情况,Kylin 将使用数据库名称 + 表名作为表的唯一名称;并且当在 Kylin 中查询时,用户需要在 SQL 中指定数据库名称(如果它不是 “default”)。 -这里有一个样例;事实表 "test_kylin_fact" 来自于默认的 hive 数据库,您不需要指定数据库名称;然而维度表来自于 "edw",在查询中您需要使用 "edw.test_cal_dt": + 这里有一个样例;事实表 "test_kylin_fact" 来自于默认的 hive 数据库,您不需要指定数据库名称;然而维度表来自于 "edw",在查询中您需要使用 "edw.test_cal_dt": -{% highlight Groff markup %} -select test_cal_dt.Week_Beg_Dt, sum(price) as c1, count(1) as c2 - from test_kylin_fact - inner JOIN edw.test_cal_dt as test_cal_dt - ON test_kylin_fact.cal_dt = test_cal_dt.cal_dt - where test_kylin_fact.lstg_format_name='ABIN' -{% endhighlight %} + {% highlight Groff markup %} + select test_cal_dt.Week_Beg_Dt, sum(price) as c1, count(1) as c2 + from test_kylin_fact + inner JOIN edw.test_cal_dt as test_cal_dt + ON test_kylin_fact.cal_dt = test_cal_dt.cal_dt + where test_kylin_fact.lstg_format_name='ABIN' + {% endhighlight %} \ No newline at end of file diff --git a/website/_dev/new_metadata.md b/website/_dev/new_metadata.md index 71e3bd2..89f2606 100644 --- a/website/_dev/new_metadata.md +++ b/website/_dev/new_metadata.md @@ -9,22 +9,22 @@ Kylin is doing a round code refactor which will introduce the following two chan * Abstract a "model_desc" layer from "cube_desc" -Before define a cube, user will need firstly define a model ("model_desc"); The model defines which is the fact table, which are lookup tables and how they be joined; + Before define a cube, user will need firstly define a model ("model_desc"); The model defines which is the fact table, which are lookup tables and how they be joined; -With the model be defined, when user define a cube ("cube_desc"), he/she only need to specify the table/column name for a dimension, as the join conditions have already been defined; + With the model be defined, when user define a cube ("cube_desc"), he/she only need to specify the table/column name for a dimension, as the join conditions have already been defined; -This abstraction is to extend the meta data to fulfill non-cube queries (coming soon); + This abstraction is to extend the meta data to fulfill non-cube queries (coming soon); -* Support data tables from multiple hive databases; +* Support data tables from multiple hive databases -User has the case that tables are from multiple hive database, and the table name might be the same; To support this case Kylin will use the database name + table name as the unique name for tables; And user need to specify the database name (if it is not "default") in SQL when query in Kylin. + User has the case that tables are from multiple hive database, and the table name might be the same; To support this case Kylin will use the database name + table name as the unique name for tables; And user need to specify the database name (if it is not "default") in SQL when query in Kylin. -Here is a sample; the fact table "test_kylin_fact" is from default hive database, you don't need to specify the db name; while lookup table is from "edw", you need use "edw.test_cal_dt" in the query: + Here is a sample; the fact table "test_kylin_fact" is from default hive database, you don't need to specify the db name; while lookup table is from "edw", you need use "edw.test_cal_dt" in the query: -{% highlight Groff markup %} -select test_cal_dt.Week_Beg_Dt, sum(price) as c1, count(1) as c2 - from test_kylin_fact - inner JOIN edw.test_cal_dt as test_cal_dt - ON test_kylin_fact.cal_dt = test_cal_dt.cal_dt - where test_kylin_fact.lstg_format_name='ABIN' -{% endhighlight %} + {% highlight Groff markup %} + select test_cal_dt.Week_Beg_Dt, sum(price) as c1, count(1) as c2 + from test_kylin_fact + inner JOIN edw.test_cal_dt as test_cal_dt + ON test_kylin_fact.cal_dt = test_cal_dt.cal_dt + where test_kylin_fact.lstg_format_name='ABIN' + {% endhighlight %} \ No newline at end of file diff --git a/website/_dev/web_tech.cn.md b/website/_dev/web_tech.cn.md index 89deb39..6c2286a 100644 --- a/website/_dev/web_tech.cn.md +++ b/website/_dev/web_tech.cn.md @@ -6,15 +6,15 @@ permalink: /cn/development/web_tech.html --- ### 项目依赖 -* npm: 用于开发阶段安装 grunt 和 bower -* grunt: 构建并安装 kylin web -* bower: 管理 kylin 技术依赖 +* npm:用于开发阶段安装 grunt 和 bower +* grunt:构建并安装 kylin web +* bower:管理 kylin 技术依赖 ### 技术依赖 -* Angular JS: kylin web 的基础支持 -* ACE: sql 和 json 编辑器 -* D3 JS: 绘制报表图表和 cube 图表 -* Bootstrap: css 库 +* Angular JS:kylin web 的基础支持 +* ACE:sql 和 json 编辑器 +* D3 JS:绘制报表图表和 cube 图表 +* Bootstrap:css 库 ### 支持的用例: @@ -22,25 +22,25 @@ permalink: /cn/development/web_tech.html * 分析师:运行查询和检出结果 * Modeler:cube 设计,cube/job 操作和监视器 -* 管理员:系统操作。 +* 管理员:系统操作 ### 技术概览 Kylin web 是一个基于 restful 服务构建的单页应用程序。Kylin web 使用 nodejs 中的工具来管理项目,并使用 AngularJS 来启用单页 Web 应用程序。Kylin web 使用来自 js 开源社区的流行技术,使其易于追赶和贡献。 ### 强调: -* 查询实用功能: +* 查询实用功能: * 表和列名称的 SQL 自动建议 * 远程/本地查询保存 * 数据网格通过简单的 BI 操作能支持百万级数据 * 数据导出 - * 简单的数据可视化(折线图,柱状图,饼图) -* Cube 管理: - * 精心设计的 cube 创建流程 - * cube 关系结构的可视化 - * 精心设计的 cube 访问管理 -* Job 管理: + * 简单的数据可视化(折线图,柱状图,饼图) +* Cube 管理: + * 精心设计的 Cube 创建流程 + * Cube 关系结构的可视化 + * 精心设计的 Cube 访问管理 +* Job 管理: * Job 步骤和日志监视器 * 杀死 * 恢复 -* 有用的管理工具。 -* 精致的外观和感觉。 +* 有用的管理工具 +* 精致的外观和感觉 diff --git a/website/_dev/web_tech.md b/website/_dev/web_tech.md index 0603eda..b663b66 100644 --- a/website/_dev/web_tech.md +++ b/website/_dev/web_tech.md @@ -36,11 +36,11 @@ Kylin web is a one-page application build on top of restful services. Kylin web * Simple data visualization(line, bar, pie) * Cube management: * Well-designed cube creation flow - * Visualization of cube relational structure. + * Visualization of cube relational structure * Well-designed cube access management * Job management: * Job steps and log monitor * Kill * Resume -* Useful admin tools. -* Refined look&feel. +* Useful admin tools +* Refined look & feel